Saturday, May 18, 2013

Stuffed Italian Bread


Stuffed Italian Bread…who woulda thunk it? But when I first saw this recipe online, I knew it would be awesome. For one thing, I LOVE bread! And for another thing, it involves onions, garlic, and cheese! Be still my beating heart! I knew I had to try this, and I was sure the family would like it, and was I ever right. It was really good and well worth the effort.

One thing worth mentioning is this: you really don’t need to have fresh baked Italian bread; since it’s going to be baked after preparing, using day old reduced price will be fine, and save you some coinage. No one will be able to tell the difference.

Also, the Dijon mustard lends a bit of a tangy taste to the finished dish. It’s not unpleasant, but if you don’t relish that sort of flavor, you may want to leave out the Dijon mustard.


So, first things first. Mince the garlic, onion, and parsley.


Using a grater, shred the sharp cheddar and Monterey jack cheeses.


Using a bread knife, slice the loaf of Italian bread by cutting diagonally one way, almost to the bottom, and then slicing diagonally again the other way. Place the loaf on a large piece of aluminum foil.


Melt the butter and olive oil together in a bowl. Then mix in the onion, garlic, parsley, Dijon mustard, and poppy seeds.


Using a spoon, pour the butter mixture into the cracks of the sliced Italian bread. I found that it worked best if I used one hand to sort of pull apart a row of “cubed” bread and the other hand to pour the butter mixture in. I went row by row, and then used the rest to pour on top of the loaf as a whole.
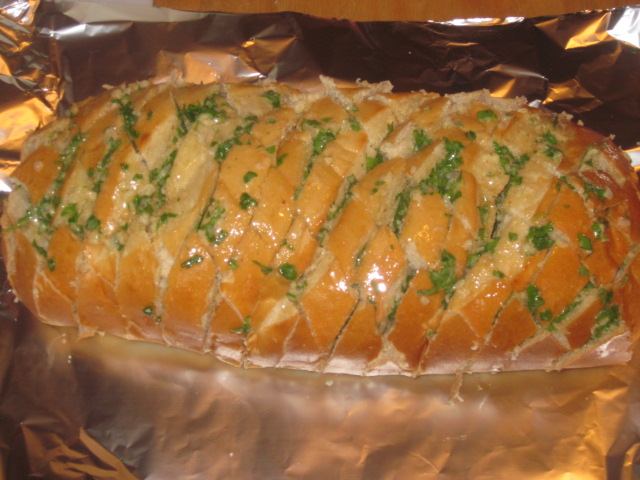

Sprinkle the cheddar and Monterey jack cheeses into the cracks and on the top just like with the butter mixture. Your hands will get a little messy doing this, but, you know, it’s worth it. ;)


Place another large piece of aluminum foil on top loosely, and seal by crimping the edges of the bottom and top pieces together. You don’t want the foil to be tight or touching the top of the cheesy Italian bread, because when it’s done and you remove the foil, it will have stuck to the cheese and pull it off. So keep the foil loose and not touching the top of the loaf.

Bake in a 350° oven for 15 minutes. Remove the top aluminum foil and bake for another 10 minutes. Serve and enjoy! ~TMMF


Stuffed Italian Bread

1 loaf Italian bread
1 stick butter
2 Tbl olive oil
3 tsp. minced onion
2-3 cloves garlic, minced
1 Tbl. Dijon mustard
1 Tbl. poppy seeds
3 tsp. chopped parsley
12 oz. shredded cheese
   (cheddar and Monterey jack)


Thursday, May 9, 2013

Greek Burger Calzone


My favorite calzone is definitely the original that I posted, You're Entering the CALZONE . But a definite second has to be the Greek Burger Calzone. I got the idea for it because many years ago, as a teen, I had taken a German class at MIT the summer between my sophomore and junior years in high school, and while there, a friend and I would take a bus and then walk over to Faneuil Hall and Quincy Market in the heart of Boston MA. The food stands were numerous and diverse, and one was a Greek place that sold what they called Greek Aegean Fare burgers. These consisted of a flat bread with ground hamburg and diced tomatoes and onions with crumbled Feta cheese. They were hot, greasy, and delicious. Every time I went to class, I stopped at that stand and got one for lunch. I was hooked.

In re-creating the recipe for a calzone, I came up with a winner, I think. Everyone loved it, anyway. ;) It was juicy and delicious, and not even as greasy as the burgers I had gotten at Faneuil Hall in Boston. I think you’ll like it too!

So, let’s get cooking!

First, you’ll either have to buy pizza dough, or make it yourself. You can find the recipe for homemade pizza dough here: Pizza! It makes enough for 2.


If you are using fresh ground beef, you’ll need to brown it, drain off the grease, and even wash it with hot water to remove any extra grease. I buy ground beef in bulk and brown it, then split it up into meal-sized portions in freezer bags and freeze. That way it’s ready to use.


While the hamburg is browning, dice the tomatoes and onions, and mince the garlic.


Press out the dough to a rectangle about 16” by 12”. I very lightly grease the table, and also my hands, with some shortening.

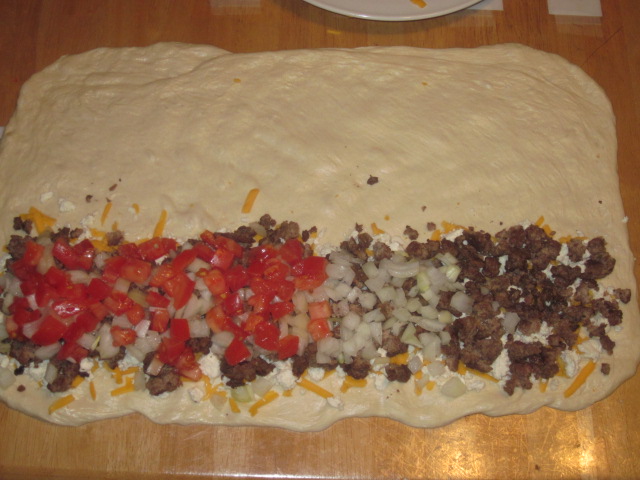
Sprinkle half of the cheddar (or mozzarella if you’d like) and feta cheeses on the lower half of the dough.


Layer on the hamburg, then the onions, the minced garlic, and then the tomatoes. Evenly sprinkle on the remaining half of the cheeses on top of it all.


Fold over the top of the dough and seal tightly. Place on a greased sheet pan. It takes two people to do this, and you need to place it diagonally in order to fit.


Bake in a 425° oven for 18 minutes, until lightly brown on top. Slice and serve. I use a rotary pizza cutter. Enjoy! ~TMMF

Greek Burger Calzone
     (for 1; about 8 slices)

1 pizza dough
½ lb browned hamburg
½ medium onion
3 Roma tomatoes
2 cloves garlic
4 oz. feta cheese, crumbled
2 c. grated sharp cheddar cheese
     (or mozzarella if you’d like)


Friday, May 3, 2013

Blueberry French Toast Casserole


This recipe is one that I found on a blog called Baking in a Tornado. With blueberries coming into season soon, I thought this would be a tasty treat to try out. I love this kind of homey casserole dish for a brunch. It looks good and tastes even better. I hope you’ll like it too.

By the way, I did adjust the original recipe as I saw fit. And it called for frozen French toast, but I made my own instead.


To make your own French toast, beat 2 eggs in a pie pan or similar wide flat container. Add ¾ c. milk, ½ tsp. vanilla, and 1 tsp. cinnamon.


Dip the bread into the mixture and cook on a greased, heated griddle. Flip when browned on the bottom.


Grease a 7X9” baking dish. Spread softened cream cheese on the slices of French toast, about ¼” thick. Place 4 slices in the baking dish, cream cheese side up. Cut in half or quarters as needed to cover the bottom of the pan.


Dry the blueberries as best you can with a paper towel or kitchen towel after you’ve washed them. Sprinkle them evenly over the bottom layer of French toast.


Place the remaining 4 slices of French toast on top in the same manner as the first layer, but with cream cheese side down.


Beat the 6 eggs well and add the 1 c. milk, mixing thoroughly. Pour over the casserole.


You can cover and let sit for several hours to have at supper time, or let it sit overnight and have it in the morning. When you’re ready for it, bake in a 350° oven for 30 minutes. Check for doneness by inserting a knife in the middle. If it comes out clean, it’s done. If not, bake for 10 more minutes and check again.

Serve with maple syrup and powdered sugar if you like. Enjoy! ~TMMF


Blueberry French Toast Casserole

8 slices French toast
     (2 eggs, ¾ c milk)
1 pint blueberries
6 oz. cream cheese
6 eggs
1 c milk


Sunday, April 28, 2013

Baked Macaroni and Cheese


Macaroni and cheese is a universal comfort food, I think. In our house it’s not just the kids who love it, but the adults, too. I came across this recipe a decade and a half ago, and my family just LOVED it! I’ve played around with it and added butter crumb toppings, butter saltine toppings, etc. If you want a real treat, chunk up some ham and add that; it’s fantastic! As always, this recipe can be easily altered to cut down on fat and calories, and still be very tasty.

So, let’s get cooking!


Cook the pasta and when done, drain and rinse off to cool and prevent sticking. You can use any shape pasta, really, but I love elbow macaroni and shells; they’re like little pockets holding the yummy cheese sauce.

While the pasta is cooking, grate the cheddar cheese and cube the Velveeta.


Start the sauce. In a large saucepan, make the roux by melting the butter and adding the flour, using a whisk. Let it bubble for a minute or two, stirring.


Slowly add about 1 cup of the milk (measure out the full amount so you have it all ready, but only pour in about a cup) and stir constantly to mix into the roux. Use a rubber spatula to get around the edges of the pan where the whisk may not reach as well. You may have some lumps at first, but fear not; just keep stirring with the whisk and you’ll work them out.

Add the rest of the milk and do the same thing, stirring constantly with the whisk. It takes maybe about 5-7 minutes or so to start thickening. Keep the heat on medium high, stirring, until it’s thick enough. Add the salt and pepper.


Add the sour cream and shredded cheddar cheese and the parmesan, stirring to melt, then the Velveeta. Use the whisk to stir frequently, until all the cheese is melted and blended in well. Remove from heat.


Make the butter crumb topping by melting the butter in a bowl and then stirring in the bread crumbs until thoroughly coated. Set aside.


When the pasta is cooked and drained, place in a greased 13X15” baking dish. Pour the cheese sauce on and mix well into the pasta. Sprinkle the crumb topping evenly over the macaroni and cheese.


Bake in a 350° oven for about 45 minutes, until golden brown on top, bubbly, and the food is nicely browned on the sides of the pan. People in my family fight over that golden brown cheesy yumminess around the sides of the pan! ;) Enjoy! ~TMMF

Baked Macaroni and Cheese

See how the cheese turns brown
and yummy on the sides? -Squee!-
1 lb. macaroni pasta
½ c butter
½ c + 2 Tbl flour
3 c milk
1 c sour cream
8 oz Velveeta
2 ½ c cheddar cheese
¼ c parmesan cheese
1 tsp salt
¾ tsp pepper


Butter Crumb Topping

3 Tbl. Butter
¾ c. seasoned bread crumbs

Sunday, April 21, 2013

Chalupas


Traditionally, Chalupas are made with hard shells and have various fillings in them, usually meats, onions and peppers, salsa, etc. Taco Bell serves them in thick shells that are crispy on the outside, yet chewy inside. I have never had them at Taco Bell (I did eat there once in the early 2000s), but this recipe is one I just threw together one night and called Chalupas. With the exception of the hard shell, my Chalupas do fit the traditional definition of the dish.

Now, there are two ways you can make the bean filling for these, and both are delicious. Originally I had been making it with ground beef and rice, but one day I didn’t have any beef, so I used just rice, and it was still yummy! The reason I had added rice to begin with was to make the filling stretch, and also save on some fat and calories. If you’re counting carbs (diabetics), you can use the ground beef alone and skip the rice altogether.


So, cook your rice using the taco seasoning mix and water. When done, mix in the cooked ground beef and the refried beans.


If not using the rice at all, mix the ground beef with the taco seasoning and the refried beans.


Now, for the recipe I made up, I use a cheese dip for one of the ingredients. You have to know that I am very much into “real” food, “whole” food, etc. But, this is one instance where I deviate from that stance. Sorry to disillusion you. ;) You can either use a jarred salsa queso dip from the store, or make it like I do. We buy a #10 can of cheese sauce from Sam’s Club, and we mix 4 cups of that with a jar of hot salsa from Wal-Mart, the Equate brand. Sometimes I mince finely some jalepeños and add them to make the cheese dip hotter.


After assembling all the ingredients, you are ready to build the Chalupas.  Lay a tortilla wrap on the plate. In the middle, spread the refried beans/rice/ground beef mixture (or refried beans/rice, or refried beans/ground beef) about ¾ of the way down. Spread on some of the cheese dip. If you want, you can heat in the microwave for about 20 seconds.


Then spread on some sour cream, and the shredded lettuce. Fold up the bottom part of the tortilla wrap, then fold  over the right side of the tortilla, then the left.

These are so good, my kids beg for them! I have made chicken fajitas for them, and breakfast fajitas, but these Chalupas are such a different flavor, they ask for them specifically. I hope you and your family enjoy them as we do!  ~TMMF


          Chalupas

          1 ¾ c. water
          1 c. rice
          1 packet taco seasoning
          ½ lb. browned ground beef
          1 can refried beans
          Mexican cheese dip
          Sour cream
          Lettuce
          Tortilla wraps


Thursday, April 18, 2013

Simply Delicious Cole Slaw


When I first made cole slaw, it was so creamy, I had to name it that. I never even liked cole slaw until I was an adult. However, once I did, for years, we would buy cole slaw from a local grocery store (YUCK!!) or a small local seafood restaurant that had the absolutely BEST whole belly fried clams, but blah cole slaw. Either way, the cole slaw we bought was limp, white, and vinegary.

However, KFC, which was the turning point for me and my love affair with cole slaw (theirs was actually what made me even like it!), was always so crisp and fresh tasting, and the sauce delicious. It was made a few times at my house, trying to recreate what I was tasting when I got it at KFC. I didn’t write down a recipe, so I just tried to wing it, using the ingredients I thought were used. It came up a hit. I believe this will be a hit with your family too.


First, after pulling off any outer leaves that are brown or withered, quarter the cabbage and cut out the core. Lay each quarter on a flat side and slice very thinly. Turn the pile of slices so the long side is horizontal, and chop finely.


Peel the carrot and grate. Add to the cabbage in a large mixing bowl..


In a medium mixing bowl, add the mayonnaise, vinegar, sugar, and celery seed. Mix thoroughly with a wire whisk.


Add to the cabbage and carrot, mixing to coat well. Refrigerate if you’re not serving right away. Yum yum! Enjoy! ~TMMF


                                                            Creamy Cole Slaw

                                                            1 small cabbage
                                                            1 large carrot
                                                            2 c. mayonnaise
                                                            ¼ c. white vinegar
                                                            1 Tbl. sugar
                                                            1 tsp. celery seed

*Note: Do not use celery salt.


Sunday, April 14, 2013

O'Henry Bars


Oh my goodness, you are going to love this recipe. Not only are they easy to make and relatively quick, they’re also scrumpdiddlyumptious. (yes that’s a made up word) My mother made these bars when I was growing up and I made them for my own children. It’s like bringing another piece of my past with me to the future. I hope my kids will make them for their children, too.

So, let’s get cooking!


Using your mixer, cream the sugar and butter together.


Add the Karo syrup, vanilla, and oats. If you’d like to, you can use the mixer to blend in the Karo and vanilla, then use a wooden spoon to mix in the oats.


Grease a 9 X 13” baking dish and press the oat mixture into the pan. It’s going to be sticky, so here’s a little tip: spray a rubber spatula with cooking spray and then use it to pat the oat mixture down into the pan.


Bake in a preheated 350° oven for 15 minutes exactly, no more and no less. Cool for ten minutes.

While that is baking, you can make the topping. Simply put the chocolate chips and peanut butter in a small saucepan and melt over medium heat. I don’t use a double boiler; besides the fact that I don’t own one, it’s easier to just heat it and stay with it, stirring, for the few minutes it takes to melt and blend together. You can be a little heavy handed with the chocolate chips and peanut butter, but what would I know about that; I always follow a recipe to the letter of the law. Bwahahahahaha! ;)


When the oat mixture bottom has cooled for 10 minutes, pour the chocolate-peanut butter mixture on top and spread evenly. When completely cooled and set, cut into 24 pieces. You can help the process along by placing in the refrigerator for a while, but these bars don’t need to be stored in the fridge.


I gave my 9 year old two of these for dessert and he begged for a third. Yours will too! Enjoy! ~TMMF

                                                        O’Henry Bars

                                                        2/3 c. butter
                                                        1 c. brown sugar
                                                        ½ c. light Karo syrup
                                                        3 tsp. vanilla
                                                        4 c. quick cooking rolled oats
                                                        6 oz. (1 c.) chocolate chips
                                                        2/3 c. crunchy peanut butter

*Notes: Use real butter. Paula Deen has it right with the butter thing. ;) Margarine is like putting plastic into your veins, but butter is a “whole” food. Don’t pack the brown sugar down. I stopped doing that decades ago. You don’t need the extra sugar, and trust me on this, it’ll be sweet enough. Use natural sugars if you can. If you want it to be really awesome, use natural peanut butter (Teddy and Smuckers both make it with just peanuts and salt). Your recipe will have less sugar in it and taste better. These are just some things I have learned from decades of cooking, messing around with recipes, and creating my own recipes in both the home and professionally in restaurants and nursing homes. Just take these little nuggets and run with them. ;)