Showing posts with label Appetizers. Show all posts

Monday, September 8, 2014

Crab Rangoon Dip


This nifty little recipe is one I found online and being #1- a lover of dips, and #2- a lover of crab Rangoon, I knew I’d be making this. This recipe is so easy and so, SO incredibly good, I could eat the entire batch myself. It’s one of my downfalls, like Rice Crispy Treats…if I make them I can’t seem to stop myself from eating them all. I think you’ll love this too. And this is one recipe I didn’t vary from one little iota, too.

So, let’s get cooking!

Set a skillet of oil on the stove to start heating. You want about 2-3 inches of oil to fry the wonton wrappers.


Meanwhile, back at the ranch…oh wait, this isn’t a western novel, it’s a recipe! Okay then, in the meantime, chop the scallions and crabmeat.


Place the softened cream cheese in a mixing bowl along with the sour cream, Worcestershire sauce, lemon juice, confectioner’s sugar, and garlic powder.

Cream with a mixer until smooth.


Mix in the crab meat and scallions using a wooden spoon.


Place in a greased 9 X 13” baking dish. Bake in a 350° oven for 30 minutes.


While the dip is baking, make the fried wontons. Test the oil to see if it’s hot enough by dropping in a tiny piece of something…I usually find a tiny piece of chopped vegetable on the table where I chopped everything and just drop it in. If it sizzles frantically right away, the oil should be ready.


The wonton wrappers should be cut in half on the diagonal so they are triangles. Just drop a few in the hot oil and in a few seconds flip with tongs. Cook just until lightly browned on both sides.


These things cook VERY quickly. Do not walk away from them; you won’t even have time to scratch an itch when you cook these. Place the cooked ones on paper towels or a paper bag to drain and absorb the grease.


Serve the dip with the fried wontons. Enjoy! ~TMMF


Crab Rangoon Dip

16 oz cream cheese
2 c crab meat
1/2 c sour cream
4 scallions
1 1/2 tsp Worcestershire sauce
1/2 tsp lemon juice
2 Tbl confectioner's sugar
1/2 tsp garlic powder
1 package wonton wrappers
oil for frying


Friday, May 30, 2014

Egg Rolls


Egg Rolls…o.m.g. (oodness) I absolutely love them, and the first time I ever had homemade Egg Rolls was at my father’s Christmas party decades ago. He had used pork, I think, and maybe shrimp in them, too. But it wasn’t until years later that I actually thought of making Egg Rolls myself. Now, y’all probably know that I *love* Egg Rolls from certain Chinese restaurants, but I have to say, I love my own homemade Egg Rolls too, and at times I actually crave them. Not trying to boast; just being honest. At times I crave the Egg Rolls made by certain restaurants too. My most favorite ones EVER were made by the Hong Kong Restaurant in Plainville MA, but they closed many moons ago. And I live in Virginia now. ;)

So here is the recipe I have made for years now, a combination of what I tasted in both restaurant Egg Rolls and the homemade that my father made. I usually use just some left over chicken in mine, but I have made them with pork or shrimp, and of course you can choose to make them with any combination of meat or seafood you choose. I hope you like it, and if I had to pick one thing I would like to improve on in my Egg Rolls, it would be how “tightly” they are rolled.

So, let’s get cooking!


For the cabbage, quarter it and slice off the core and discard.

Now slice that quarter of a cabbage in thin slices, and afterwards chop them into small pieces.


Dice the Vidalia onion, carrot, and celery in small pieces, almost mincing them. Peel and mince the garlic cloves, or use a garlic press at the appropriate time.


Mince the chicken or whatever meat or seafood you’ve chosen.

Place all those vegetables in a medium bowl with the minced meat and the bean sprouts.

Mix in the soy sauce well.


For assembly: Pour water into a ramekin at the ready, and lay an egg roll wrapper down in front of you with points so it forms a diamond. In the middle, place about  1/3 c of the veggie/meat mixture.


Fold the bottom point of the diamond up and over the pile of veggie/meat mixture. Dip fingertip in the ramekin of water and brush along the top side edges of the left and right  of the egg roll wrapper.


Fold the left point of egg roll wrapper to the middle, then the right side.


Now roll the egg roll towards the top point tightly, to seal, being careful not to rip the wrapper.


While assembling the Egg Rolls, start heating the oil in a large sauce pan or a very deep skillet. You want at least four inches of oil. Test it for readiness by dropping in a tiny scrap of cabbage, carrot, or whatever, and if it sizzles immediately and dances around, the oil is ready to cook the Egg Rolls.


Gently place 4-5 Egg Rolls in the hot oil and cook until golden brown on each side. It usually takes about 2 minutes or so, and I use a metal slotted spoon to roll each Egg Roll over to cook on the other side.


Place the cooked Egg Rolls on a sheet pan lined with one or two layers of paper towels to absorb the grease, and continue until all are cooked.

Serve and enjoy! ~TMMF


Here's my lovely daughter Caitlin assembling Egg Rolls. <3
Egg Rolls

1 package Egg Roll wrappers
¼ head large cabbage
1 can or 1 c fresh bean sprouts
½ md Vidalia onion
1 lg stalk celery
1 lg carrot
3 huge cloves garlic
2 c chicken
1 ½ Tbl soy sauce


Friday, May 16, 2014

Crab Rangoon


Crab Rangoon, sometimes called Cheese Wontons, have been one of my favorite Chinese foods for years. Some restaurants make them in a triangle shape, while others pull the four corners up to make what looks like a pouch. I myself prefer making them triangular, as it has a better seal for the delectable contents inside. Figuring out what is inside the wonton wrappers wasn’t hard; it’s basically four ingredients that one of my sisters came up with, and having eaten them at restaurants myself, I agreed. ;)

I want to tell you that I’ve cooked these two different ways, and neither is necessarily better than the other. I have deep fried them and I’ve fried them in a very much smaller amount of oil in a skillet. Either way, they are heaven wrapped in a little wonton. Here, though, I am showing them deep fried.

So, let’s get cooking!


First, thinly slice the scallions, and use both the white and the green. Chop the imitation crab meat finely. It definitely does not have to be minced, as you’d do with garlic or ginger root, but you do want the pieces fairly small because, after all, the filling is going into wonton wrappers.

Cream the cream cheese…doesn’t that sound redundant? ;) You do want it to be nicely smooth to work with. I started adding a little milk to it to make it more smooth and creamy when the Crab Rangoon are done. Just add the milk and beat it on in there.

Now add the scallions and crab meat to the cream cheese mixture, along with the black pepper, and mix thoroughly with a wooden spoon. The filling is now ready.

Start heating the oil in a large saucepan or a deep skillet. It can heat while you’re putting the Rangoon together. Don’t set the heat under the oil higher than medium after it gets hot enough. Also, prepare a sheet pan with a couple layers of paper towels to set the cooked Crab Rangoon on.


To assemble the Rangoon, you’ll need a small bowl or ramekin with water, and a teaspoon for the filling. Lay one wonton wrapper down so it looks more like a diamond. Place a spoonful of  the filling in the middle; about a tablespoon’s worth.

The second step is to dip your fingertip in the water and wet the upper left and right sides of the wonton wrapper, then fold the bottom half over, matching sides up, to form a triangle. Press the two sides down to seal.

Lay them on a platter, but I don’t recommend stacking them on top of each other, as sometimes they might stick and then they may rip a little when you try to separate them. But how would I know anything about that? ;)

While I’ve made these alone a few times, I usually have someone help me with this, as it is SO much easier when it comes time to cook them. I usually help with assembling the Rangoon for a bit, then switch over to do the frying while my daughter Caitlin keeps working on assembling. Once you start the cooking process, it moves very quickly.


When the oil is ready, tested by dropping a tiny bit of something in (scallion, tiny piece of crab), gently drop in four to six of the Crab Rangoon. They usually take less than a minute on each side. You want them to be a golden brown.

IMPORTANT: This is a very fast cooking food; you cannot step away from these at all when cooking. That’s why having two people make these is preferred. Get your kids involved--you both will love cooking together and be glad you did!

Place the finished Rangoon on the sheet pan with the paper towels to absorb extra oil. I’m usually making these with other Chinese dishes, so I also turn the oven on to the lowest setting (150°?) and place the sheet pan in it to keep them warm while I finish up the other recipes.

And there you are, delicious Crab Rangoon. Enjoy! ~TMMF

Crab Rangoon

1 package wonton wrappers
2 ½ 8 oz pkgs cream cheese, softened
¼ c milk
1 lb. imitation crabmeat
5 whole scallions
½ tsp black pepper
About 4” of oil to fry

Wednesday, October 30, 2013

Salsa...a-cha-cha-cha!


Salsa….oh how the word brings to mind frills, clattering heels, and a fast beat! Oh, wait…that’s the dance. Okay, salsa the FOOD….mmmmm, my mouth is watering right now thinking of it. We’ve all had the store bought salsa: mush with a kick. To be fair, there are a couple fresh salsas out there, usually in the produce section, that truly are just like what you can make fresh at home. But the price is so prohibitive. Do you realize how inexpensive Roma tomatoes and hot peppers are? The other ingredients are pretty inexpensive too, so hey, why not? At least try it. Once you’ve made your own salsa, you won’t want to go back to the jars. Keep some on hand for emergencies (yes, needing salsa quick *is* an emergency!); but you’ll want the homemade too.

So, let’s get cooking!


After you’ve gathered and washed all your ingredients, core and dice the Roma tomatoes. This is the most tedious part, so I like to get it out of the way first.


When handling the jalapeño peppers and/or serranos, wear gloves. Trust me on this, do not use your bare hands. And whatever you do, DO NOT touch your eyes or face at all. When you are done, remove the gloves and wash your hands very well. Don’t ask why I’m warning you so well. Okay, I’ll give you a hint: it involves jalapeños, contacts, and a loud “AAAAAAUUUUG!” coming from my mouth.


Dice the onions and green peppers, and mince the jalapeños, serranos, garlic, and fresh cilantro.


Place all in a large mixing bowl and mix together.


Now for the limes. ♫ You put the lime in the coconut and shake it all up! ♫ Okay, wrong song. ;) Before cutting, roll the limes on the table or counter under your hand, applying some pressure. This will squeeze the juice from the cells inside the lime, and when you go to juice it, you’ll get more. Making the lime a little warmer also helps you get more juice from it. Squeeze the juice.


Add to the mixture of salsa vegetables and mix well.


Store in a jar or bowl overnight, letting the juices meld and sink in. You can eat it right away, but it may not be as hot as when you let it sit for a while. Store in the fridge, by the way. If it lasts that long!


Serve with tortilla chips, or use in omelets, tacos, fajitas, etc. Enjoy! ~TMMF


Salsa

12 Roma tomatoes
1 Vidalia onion
1 green bell pepper
2-3 jalapeño peppers
2-3 Serrano peppers
2-3 lg. cloves garlic
½ c. fresh cilantro
4 Tbl. Fresh lime juice


Saturday, October 5, 2013

Cheesesteak Crescent Rolls


Cheesesteak Crescent Rolls….I done died and gone to Heaven! Sliver-thin steak, two kinds of cheeses, and soft, slightly sweet crescent rolls. Yuminy!! I saw this recipe online, and being the Philly cheesesteak lover that I am, I knew I had to try these. They were a hit with the entire family, and will definitely be made again! Without further ado, let’s get cooking!


You can use Steak-umms, which I’ve used plenty of times, but for this I only had a similar product that I’d gotten at Sam’s Club. It’s shaped into thicker ovals, and separates as it cooks. Whichever you choose to use, set the steak to cooking in a skillet with a little oil or some cooking spray.


While the meat is sautéing, slice the green peppers and sweet onions into lengths of about 1”. Sauté in the butter until tender. You’ll have to keep an eye on both the steak and the peppers and onions, stirring as necessary. You can do this! Think of how scrumptious this will be when it’s done!


If you’ve used Steak-Umms steak “sheets,” chop up the meat after it is done cooking. Add the peppers and onions to the cooked (and chopped or separated) steak, as well as the cream cheese.


Stir and cook over medium heat until cream cheese melts and blends in.


Next, take the Swiss cheese slices and cut them into four strips each.


Open the crescent rolls and separate into the individual rolls. Lay one on the cutting board or another flat surface, and press flat. Place a strip of Swiss cheese in the middle, and then about 2 Tbl. Of the steak/veggie/cream cheese mixture.


Roll up the crescent rolls, pinching sides as needed to seal the mixture in. Place on an un-greased cookie sheet, 1-2 inches apart.


Bake at 350° for 10-15 minutes. Check after about 13 minutes just to make sure. When they are just slightly browned on top, remove from oven. Serve with a smile. Enjoy! ~TMMF

                                             Cheesesteak Crescent Rolls

                                             1-2 Tbl butter
                                             1 green bell pepper
                                             1 Vidalia onion
                                             12 oz. Steak-Umms or equivalent
                                             8 oz. cream cheese
                                             4 slices Swiss cheese
                                             2 tubes refrigerated crescent rolls

Sunday, July 28, 2013

Buffalo Chicken Cups


This is a recipe I saw online when a Facebook friend shared it. It comes from Jessie’s Pampered Chef Page, and it looked so delicious. I never got into the taste of buffalo chicken until several years ago when one of my sisters brought Buffalo Chicken Dip to the family Christmas party. I think one reason I hadn’t liked it before was that, until then, I had seen Buffalo Chicken anything served only with blue cheese, which I have never liked. But when my sister made this dip, it was made with sharp cheddar cheese, and I tried it and have been hooked ever since!

Thus, I did change out the blue cheese in this recipe for my much preferred extra sharp cheddar. I also replaced the wonton wrappers with the store brand of “Grands” flaky biscuits. I felt the wonton wrappers would be too crispy, and the flaky biscuits lent a delightful slightly sweet taste to the heat of the hot sauce and the tang of the cheedar. I think you’ll like how these taste too!


So, set the chicken breasts to cooking in a sauté pan with a little olive oil.


While the chicken is sautéing, melt the cream cheese with the Ranch dressing in a saucepan, stirring to mix in. Grate the cheddar cheese also during this time.


When the chicken is fully cooked, place in a bowl and pull apart with two forks to shred. Add the hot sauce and thoroughly coat. I have found the store brand to be just as fine as Frank’s hot sauce, and it’s less expensive.


Now for the biscuits. Spray the muffin tins with cooking spray first. Take the “grands” biscuits, and cut each one in half. Press each half flat and round it out as you go.


Press each flattened half biscuit into the sprayed muffin tins, pressing up the sides. You’ll end up with leftover biscuits, as this recipe made 24. Just pop them on a cookie sheet and bake afterwards for the kids to eat.


Next, spoon about a tablespoon of the hot sauce coated chicken breast into the biscuits in the tins.


Add approximately 1 ½ tablespoons of the cream cheese -Ranch dressing mixture on top of the shredded chicken. Sprinkle the cheddar cheese on top lastly, dividing it up between all 24.


Bake in a preheated 350° oven for 10-15 minutes, until biscuit dough is lightly browned. Enjoy! ~TMMF

                                              Buffalo Chicken Cups

                                             2 cans large flaky biscuits
                                                   (or 3 cans small)
                                             1 8 oz. pkg. cream cheese
                                             1 c. Ranch dressing
                                             2 small chicken breasts
                                             ½ c. Frank’s Red Hot sauce
                                             1-1 ½ c. sharp cheddar cheese


Saturday, May 18, 2013

Stuffed Italian Bread


Stuffed Italian Bread…who woulda thunk it? But when I first saw this recipe online, I knew it would be awesome. For one thing, I LOVE bread! And for another thing, it involves onions, garlic, and cheese! Be still my beating heart! I knew I had to try this, and I was sure the family would like it, and was I ever right. It was really good and well worth the effort.

One thing worth mentioning is this: you really don’t need to have fresh baked Italian bread; since it’s going to be baked after preparing, using day old reduced price will be fine, and save you some coinage. No one will be able to tell the difference.

Also, the Dijon mustard lends a bit of a tangy taste to the finished dish. It’s not unpleasant, but if you don’t relish that sort of flavor, you may want to leave out the Dijon mustard.


So, first things first. Mince the garlic, onion, and parsley.


Using a grater, shred the sharp cheddar and Monterey jack cheeses.


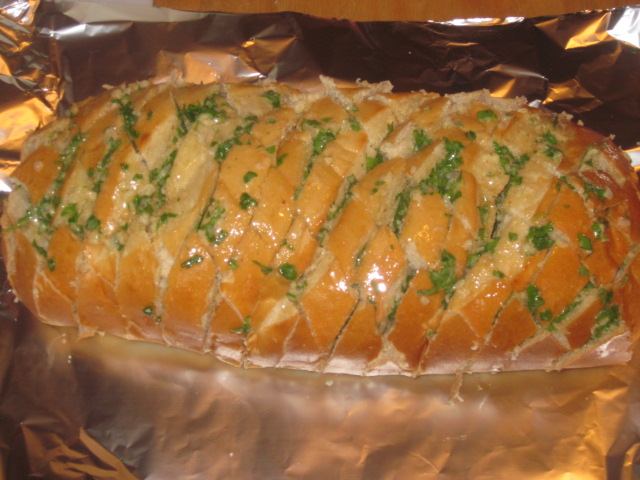
Using a bread knife, slice the loaf of Italian bread by cutting diagonally one way, almost to the bottom, and then slicing diagonally again the other way. Place the loaf on a large piece of aluminum foil.


Melt the butter and olive oil together in a bowl. Then mix in the onion, garlic, parsley, Dijon mustard, and poppy seeds.


Using a spoon, pour the butter mixture into the cracks of the sliced Italian bread. I found that it worked best if I used one hand to sort of pull apart a row of “cubed” bread and the other hand to pour the butter mixture in. I went row by row, and then used the rest to pour on top of the loaf as a whole.


Sprinkle the cheddar and Monterey jack cheeses into the cracks and on the top just like with the butter mixture. Your hands will get a little messy doing this, but, you know, it’s worth it. ;)


Place another large piece of aluminum foil on top loosely, and seal by crimping the edges of the bottom and top pieces together. You don’t want the foil to be tight or touching the top of the cheesy Italian bread, because when it’s done and you remove the foil, it will have stuck to the cheese and pull it off. So keep the foil loose and not touching the top of the loaf.

Bake in a 350° oven for 15 minutes. Remove the top aluminum foil and bake for another 10 minutes. Serve and enjoy! ~TMMF


Stuffed Italian Bread

1 loaf Italian bread
1 stick butter
2 Tbl olive oil
3 tsp. minced onion
2-3 cloves garlic, minced
1 Tbl. Dijon mustard
1 Tbl. poppy seeds
3 tsp. chopped parsley
12 oz. shredded cheese
   (cheddar and Monterey jack)