Friday, March 15, 2013

Mom's Barbecue Sauce


Barbecue sauce isn’t just for meats on the grill; it’s delicious on chicken baked in the oven during the winter. Although we have been known to use the grill during the winter also. ;) This recipe is what my mom used when I was growing up. It’s delightfully hearty, and when I smell it baking on the chicken, it takes me back to my childhood.


Chop the onions and set aside. You want them to be smallish, but you don’t have to mince them.


In  a medium saucepan, mix together the tomato sauce, lemon juice, molasses, Worcestershire sauce, mustard, and salt. Add the chopped onions.


Simmer 30-45 minutes. I simmered mine for 45 minutes for a somewhat richer taste. You can cook it for less time if you prefer.


While the barbecue sauce is simmering, you can start the chicken. For this recipe I used chicken leg quarters and separated the legs and thighs. Legs and thighs are our family’s favorite parts, and I also get them for around 59¢ per pound.


Spray sheet pan or baking dish with cooking spray. Place the chicken skin side down and bake for about 25 minutes in a 350° oven. Take the pan out, coat with barbecue sauce, and turn the chicken over. Cover the tops of the chicken pieces with the rest of the barbecue sauce.


Bake for another 35 minutes. I served this a few weeks ago with corn and Company Mashed Potatoes (recipe to come soon). Enjoy! ~TMMF


                                                              Mom's Barbecue Sauce

                                                             1 c. chopped onions
                                                             2 Tbl. oil
                                                             3 ½ c. tomato sauce (canned)
                                                             ¼ c. lemon juice
                                                             ¼ c. molasses
                                                             2 Tbl. Worcestershire sauce
                                                             1 tsp. yellow mustard 
                                                             1 tsp. salt

Wednesday, March 13, 2013

Irish Soda Bread


With St. Patrick’s Day coming up, I thought I’d share this quick and easy recipe for Irish Soda Bread that my mom used to make when I was growing up. It’s so good, and just sweet enough to feel like it could be dessert. I like it in the morning with a nice cup of hot tea.


Add the vinegar to the milk, stir, and set aside for now.

Mix together the flour, sugar, salt, and baking soda. Add the raisins and caraway seeds and mix well.


Using a fork, beat the egg in a small bowl. Melt the butter in another bowl.


Add the egg, milk, and butter to the dry ingredients, stirring till just mixed. It will look lumpy, and that’s not just from the raisins. ;)

Pour the batter into a greased 9 x 13” baking dish. Smooth out so it’s all even.


Bake in a 350° oven for 25-30 minutes. I would seriously check it at 25 minutes, to be safe. It should be lightly browned on top, and edges pulled away from the sides of the baking dish. I probably could have taken mine out a few minutes before I did. Mea culpa. ;)


We usually just eat it plain, but you can serve it with butter if you’d like. Erin go braugh! as the Irish say.  Enjoy! ~TMMF

Irish Soda Bread

2 c. milk
2 Tbl. vinegar
4 c. flour
½ c. sugar
1 tsp. salt
2 tsp. baking soda
½ 12 oz. box raisins
1 Tbl. caraway seeds
1 egg
½ c. butter


Monday, March 11, 2013

Oven French Toast


This is a recipe that one of my sisters first made to bring to a family brunch many years ago. It was an instant hit, and I started making it for my own family. What I love about this recipe is that, besides being to-die-for delicious, it’s easily adaptable for cutting down the fat and calories, and still downright tasty.

For the stale French bread, I always look at the day old rack and get a loaf of that. I’ve used Italian bread for this too, if that’s all I could get. If you can’t get any that’s stale enough, cut it and lay them out to get drier the day before you make them.

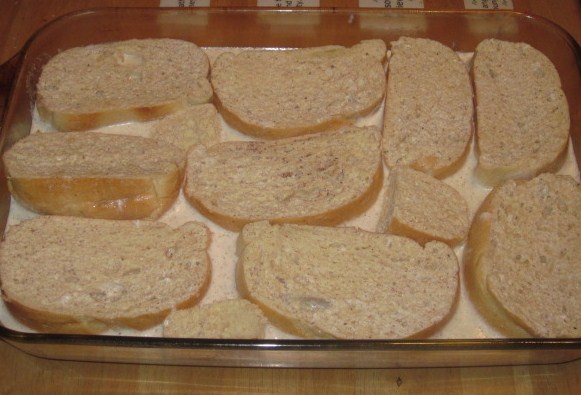
So, you want to cut the French bread into 1” slices, and place them in a  greased 13X15”  baking dish.


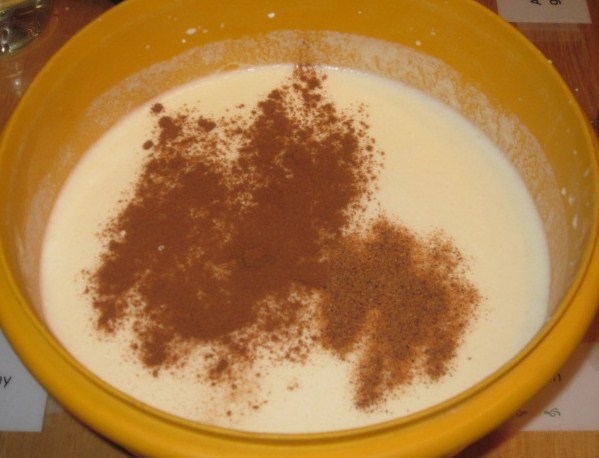
Mix together the eggs with a wire whisk, then add the milk, half-and-half , and vanilla. Add the nutmeg, cinnamon, and mace, mixing well. If you don’t have mace on hand, just add a little more nutmeg and cinnamon. I’ve made it with mace and without, and it’s good no matter what.


Pour the mixture over the bread slices in the pan. Cover and set aside overnight.


Before baking, you need to make the topping. Chop the nuts. You want them to be smallish. I’ve made this dish using walnuts and using pecans, but since I like the taste of pecans more, I tend to use them more.


Mix together the softened butter, brown sugar, Karo syrup, and nuts.


Spread the topping on top of the soaked slices of French bread. You might need to use a rubber spatula.


Bake at 350° for about 50 minutes. You can tell it’s done by how brown and bubbly it will be, and also by inserting a knife in the middle. If it comes out without any egg mixture, it’s done. Keep in mind that the knife will have some of the topping on it, but that will be brown. If you don’t have any yellowish egg mixture, it’s done.

You can serve this with a little maple syrup on it if you‘d like, but believe me, it’s plenty sweet without it. My family doesn’t bother with the maple syrup. Enjoy! ~TMMF


                                          Oven French Toast                  Topping


              1 loaf  stale French bread                  ¾ c. butter, softened
                  8 large eggs                            1 1/3 c. brown    sugar
                                          2 c. milk                                 3 Tbl. Karo
                                          2 c. half and half                      1 1/3 c. walnuts or pecans
                                          2 tsp. vanilla
                                         ½ tsp. nutmeg
                                          1 tsp. cinnamon
                                         ½ tsp. mace

Friday, March 8, 2013

Pizza Part D: Chicken and Caramelized Onions


It’s that time again. For what? You ask. It’s that time for PIZZA!!!  I seriously could eat pizza three times a week and never get tired of it. So many lovely combinations of sauces, cheeses, toppings….


Today let’s look at one with Chicken and Caramelized Onions. The first time I ever had caramelized onions on a pizza was at one of those brick oven pizzerias, and I couldn’t imagine having something sweet on pizza, especially with tomato sauce. But then, it was love at first bite.

 Before I start drooling and short out my keyboard, let’s get cooking!


First, start the chicken breast cooking in a skillet with a little oil. When done and cooled enough to handle, cut into small chunks.


Meanwhile, you’ve got other things to do! Caramelized onions are made by cooking slowly for 30 minutes to an hour. Go ahead and do it that way if you have the time, but I make them another way that is a lot quicker.


Slice the onions in half, place the cut side down, and cut into ¼” slices. Heat a skillet on high, add the 2-3 Tbl. butter and the sliced onions. Cook for 7-8 minutes on high to brown them, stirring very frequently.


Turn the heat down to medium and add the brown sugar...


             ....and cook until tender, about 5-10 more minutes.


Press the dough into the greased sheet pan or pizza pan. Spread the sauce on.


Sprinkle the mozzarella cheese on, and then crumble the feta cheese evenly on top. I love how the tangy taste of the feta goes so well with the sweet taste of the onions on this pizza.


Distribute the caramelized onions evenly on top now. I just use my hands to do this, because that way I can use my fingers to separate the onions easier. Using a spoon or fork doesn't work as well.

Next layer the chunked chicken.


Bake for 18-20 minutes at 425°, until browned nicely on the bottom. Enjoy! ~TMMF


Chicken and Caramelized Onion Pizza

1 pizza dough
1 chicken breast
1 lrg. or 2 md. Vidalia onions
2-3 Tbl. butter
1 Tbl. brown sugar
1 c. tomato based sauce of your choice
2 c. mozzarella cheese
4 oz. feta cheese


Wednesday, March 6, 2013

You're Entering the CALZONE...


Okay, almost nothing can cause me to start drooling at the mere mention of it like calzones. I love them! And when the family hears that I’m making them, they get excited and say things like, “I LOVE YOU!” ;)

The first time I ever even heard of a calzone was way back in 1983. I had ordered one from a restaurant in a neighboring town, and while looking at it and eating it, I thought, I can make this! And I did. For the most part, it was just a matter of figuring out how much of each ingredient to use. The ingredients in this particular recipe are my absolute favorite for calzones.

I’ll tell you right now, there will be a lot of pictures. But that’s because you’ll have a clearer idea of the instructions if you can see for yourself what it should look like. So, let’s get cooking!


Chop your onions, and if you want to, the mushrooms.


Lightly grease your working surface (I use my table for this). Grease your hands slightly, and press out the dough into a rectangle, about 16” by 12”.

Sprinkle 1 ½ c. of the mozzarella on the lower half of the dough. :::Psst! Wanna know a secret? Sometimes I use 2 c. of cheese on the bottom and on top too!:::


Layer on the ham, two slices thick on each end and one slice folded in half in between them.


Next comes the pepperoni. I don’t exactly put double pieces on, but I layer them so there’s plenty to give the calzone that characteristic zip.


Evenly spread out the mushrooms and onions. I don't know why I always put the mushrooms first, but I do. ;)


Lastly, sprinkle on the other 1 ½ c. of mozzarella cheese.


Carefully loosen the top half of the dough and flip it over the top of the calzone to cover. Seal the edges by pressing down and pinching. You’ll need another person to help you carefully lift the calzone and place it diagonally on a greased sheet pan.


Bake at 425° for 18-20 minutes. It should be lightly browned on top and will make a “thump” when you tap the top. Slice and serve. I use a rotary pizza cutter.


Calzones

pizza dough
     (store bought or homemade pizza dough)
3 c. mozzarella cheese
5 slices ham
45 or so slices pepperoni
2 small cans mushrooms
1 medium Vidalia onion


Monday, March 4, 2013

Chocolate Pie with Oat Flour Crust


Today I made a chocolate cream pie with an oat flour crust. I have been in love with oats for years. I consider them one of my four food groups. ;) This crust is quick and very easy to make, and it tastes like an oatmeal cookie.


Melt the butter and set aside.


Mix together the oat flour, brown sugar, and cinnamon.


Add the melted butter and mix well with a wooden spoon. It may look like it’s too moist or sticky, but if you press into it with your finger, you’ll see that it’s not.


Press the mixture into an un-greased 9” pie pan, making sure it comes up the sides. Bake in a 350° oven for 10 minutes, and not a minute more! Let cool.


When the crust is cooled sufficiently, mix up the filling. I’ve made pie fillings from scratch, but for this I did use a packaged pudding mix. I used 2 boxes of instant pudding and 2 ½ c. milk. Whisk until the pudding is fairly thick, and then pour into the oat flour crust. Let set in the refrigerator until firm.


While the pie is chillin’ out, make the whipped cream. Beat the cream until firm enough to keep it’s shape when you lift the beaters out. I actually prefer my whipped cream au natural, but if you like, add the vanilla and confectioner’s sugar, and beat another 30 seconds or so to blend it in.


When the chocolate pie is firm enough, slice and serve with a generous pile of the whipped cream. Watch the smiles come out! ~TMMF


Oat Flour Crust                                                         Whipped Cream

1/3 c. butter                                                             1 pint heavy cream
1 1/3 c. oat flour                                                       1 tsp. vanilla
¼ c. brown sugar                                                      1/4 c. confectioner's sugar
¼ tsp. cinnamon


Saturday, March 2, 2013

Winter Veggie Soup


So, most people I know are living in parts of the world where Winter still has them clutched in his icy fingers. That makes me want to cook up something hot and comforting for the family. Recently I came up with this recipe for a soup made with hearty winter vegetables, using a smoky ham stock as the base. The result was quite tasty and I named it Winter Veggie Soup.

Now, the first time I made this, I had taken the gooey drippings from the pan of a baked ham I had made, and froze them just for the purpose of flavoring a soup. I used that lovely little mess of intense flavor and the soup was a hit. The next time I made it, I didn’t have my special baked ham drippings waiting in the freezer for me, so I had to go another route if this soup was going to pass the taste test of my family.

Enter…the ham hock. Only God knows what a ham hock truly is, but all I know is that ham hocks are a suitable stand-in for a ham bone, for flavoring, and therefore I will use them. Now, lest you think I have delusions about ham hocks being the sole flavor and meat source for a soup, rest assured I do not. Trust me, you’re not going to get more than about two tablespoons of meat off of 3 of them combined. So, if meat is important to you, chop up a couple cups of cooked ham and throw that in.


So, now that we know where we stand on the ham hock issue, let’s get cooking! Take said ham hocks and place them in 8 cups of water. Bring to a boil, then turn down heat to simmer for an hour. When done, you’ll take out the ham hocks and place on a plate to cool.


Meanwhile, set to chopping the vegetables. Dice the sweet onions and slice the celery stalks. Dice the turnip, and peel and slice the carrots into rounds.


Add the onions, celery, and turnip to the ham stock and bring to a boil, then lower heat to simmer gently. After about 30 minutes, add the carrot rounds.


Cube the potatoes, rinse them off, and boil until just tender. When the turnip and carrots are tender, add the cubed potatoes, and the ham if you desire it.


Now, if you have no succulent and flavorful drippings from a ham dinner to add to your stock, you’ll need a little help. The ham hocks have given your soup a little flavoring, but not enough. This is where bullion comes in. I use moist Berkley & Jensen (BJ’s Wholesale Club) bullions, or, if I need it, a product called Better Than Bullion; a moist flavorful bullion "spread" in a jar.

For a meat that is neither chicken nor beef, we must tread carefully. Through my years of cooking and experimenting, I’ve come up with a satisfactory combination for pork or ham that imparts essential flavor to the dish, and anyone who eats at your table will believe that you merely work miracles. ;)

Add 2 cubes of a BJ’s chicken bullion, or the equivalent of another brand, and 1 cube of  a BJ’s beef bullion, or the equivalent of another brand. Each BJ’s bullion is worth 2 standard grocery store bullion cubes. Stir well until dissolved. Simmer for a few minutes, and taste, adding 1 tsp. black pepper. Serve with some soft homemade dinner rolls or, for a quick accompaniment, some French bread from a local store. Ham Fat Rolls go wonderfully with this wintry soup. Enjoy! ~TMMF


Winter Veggie Soup
     (serves 8)

1 package ham hocks, OR 1/2-1 c. pan
   drippings from a baked ham
8 c. water
1 medium Vidalia onion
2 stalks celery
4-5 large carrots
1 medium turnip
2 medium potatoes
2 cubes BJ's chicken bullion, or the equivalent of another brand
1 cube BJ's beef bullion or the equivalent of another
brand