Thursday, July 21, 2016

Spicy Orange Chicken


Lately I’ve been craving some chicken with an Asian flair to it, and my dear assistant cook Miss Megan has also been asking for something like that too. I thought Orange Chicken would fit the bill. There are many recipes for Orange Chicken out there, but since I didn’t feel like looking any up, I just let it roll around in my head a little while and then went with it. This is what I came up with.

Just so you know, it is VERY spicy with 2 tsp red pepper flakes, so it may be a little too hot for some children. You might want to use just 1 tsp, and then add a little to your own portion so the kids’ tongues don’t burst into flames. Or God forbid one of them burps---someone may have their eyebrows singed! ;-) 

So, let’s get cooking! 


Peel and mince the ginger root. Don’t you just love working with fresh ginger?? It’s so juicy and fragrant! 

Peel and mince the garlic, and slice the red pepper into 1 inch lengths. 

And peel and dice the carrots small. My lovely assistant cook Miss Megan did the “cawwots,” as she says.


Next, cube the boneless skinless chicken breast into chunks about ¾ inch size. 

In a gallon size bag, with the cornstarch in it, coat the chicken chunks. Shake off the excess cornstarch in a sieve and return the cornstarch to the bag for the next handful of chicken chunks. 

In a large skillet, sauté the coated chicken in the oil, using a Tablespoon at a time. You can do it in batches, adding more oil when needed. Cook until all sides of the chicken are sautéed. They’ll finish cooking in the next steps.


Add the orange juice concentrate, water, rice vinegar, brown sugar, garlic, and ginger. Mix well and simmer for about 6-8 minutes, stirring several times. 

Add the dices carrots and simmer about 4 minutes, covered. You can really see how it thickens now. 

Add the red bell peppers and broccoli florets. Cook for about 4-5 minutes more, covered.

Serve over rice if you’d like. It can be eaten by itself, of course, but it does go very nicely with rice. This is an excellent dish to make when you have leftover rice from another meal.

Enjoy! ~TMMF


Spicy Orange Chicken

1 ½ lb chicken breast
¾ c cornstarch
¼ c oil
1 red bell pepper
24 oz broccoli florets
2-3 cloves garlic
1 ½ inch ginger root
1 c carrot, diced small
½ can frozen orange juice concentrate
½ c water
¾ c rice vinegar
¾ c brown sugar
2 tsp red pepper flakes


Monday, May 23, 2016

Dilled Seafood Salad


This recipe comes from Recipes.com. It caught my eye because I love seafood salad, and I was curious about using the sour cream in it, as well as the dill. I’ve never been a fan of dill, and now I must admit...I’ve never used it in my cooking! Oh the shame I feel now! ;-) But I did use it and liked it, then went on to create a simple soup recipe using it, which will be forthcoming in the near future.

The changes I made: I didn’t add the hard boiled egg (my kids wouldn’t have touched it if I had), the scallions, or the salt. I actually don’t use much salt in my cooking anyway. I used slightly more imitation crab meat, doubled the celery, and I halved the dill. Not because I’m not a fan, but because I wanted to see how it looked before I added the other teaspoon of it, and it looked plenty dilly. ;-)

So, let’s get cooking!


Chop up the imitation crab meat and the shrimp, and dice the celery. These are all great food prep tasks for the kids; even a four year old can use a butter knife and do the shrimp. :-)


Put it all in a bowl and add the rest of the ingredients. Again, another great way to get the kids involved in cooking with you, and teach them about measuring and mixing.


Stir thoroughly, and serve! I made subs out of it with lettuce, but I also ate some rolled up in a nice green lettuce leaf.


Enjoy! ~TMMF


My lovely assistant Megan :-)


Dilled Seafood Salad

8 oz shrimp
8 oz imitation crab meat
½ c celery (diced)
¼ c mayonnaise
3 Tbl sour cream
1 tsp dill

Monday, April 25, 2016

Savory Rice on Fire!


I love rice. Do you love rice? I just love it, especially Arborio rice! So one night as I was thinking on what to make as a side for the baked chicken I had planned, this recipe popped into my mind and down through my hands. It looks innocent enough, but it’s got a kick. ;-) It is my original, by the way. :-) 

So, let’s get cooking!


First you want to do the veggie prep: dice the onion, julienne the carrots, and mince the fresh ginger and garlic.


In a large skillet over medium heat, sauté the carrots and onion in the toasted sesame oil and vegetable oil, about 3-4 minutes. Add the garlic, ginger, and red pepper flakes, cooking a minute more.


Add the rice and about ½ c of the chicken stock, stirring continuously, until liquid is absorbed. 


Add another ½ c stock and do the same, until the rice has absorbed it. 


Repeat until all the chicken stock has been absorbed. It won’t be dry, it’ll be slightly saucy. Toss in the parsley flakes and soy sauce. Viola! (I really do know it’s voilà; I just can’t help thinking of someone's Aunt Viola and laughing!) 

Enjoy! ~TMMF


My lovely assistant cook, Megan. ♥ 


Savory Rice on Fire!

½ Vidalia onion
2 big cloves garlic
1” fresh ginger
2 carrots
1 Tbl toasted sesame oil
1 Tbl vegetable oil
1 tsp red pepper flakes
1-2 tsp parsley flakes
1 Tbl soy sauce
1 c Arborio rice
3 c chicken stock


Monday, April 18, 2016

Kielbasa Zucchini Sauté with Couscous


This recipe is one that had been rolling around in my head for a while until I felt ready to create it. I had actually been thinking of a recipe to enter in a contest, but then I never entered it. I wanted something easy, with a fresh light taste, and I also wanted it to have something a little different than the usual bed of pasta, and couscous seemed to fit the bill. I hope you enjoy it.

So, let’s get cooking!


Cut the zucchini into strips and then chunks. This is a great job for younger cooks in the house!


Dice the red pepper and onion, and peel and mince the garlic. I have a habit of mincing the garlic with my garlic press when it’s time to add it to the pan. ;-)


Slice up the kielbasa on the diagonal. Or just be a rebel and slice it into straight up circles. You alone will bear the responsibility of the shape of your sausage in this recipe. Just don’t come crying to me if your perfect circles ruin the dish. ;-)


Now, in a large skillet, sauté the peppers and onions in the oil for about 3-4 minutes, until just tender.


Add the minced garlic and zucchini, along with the red pepper flakes, oregano, and the ½ c chicken stock, and sauté for 5-6 minutes, stirring frequently.


Toss in the kielbasa and cook just long enough to heat the meat.


Cook the couscous in the chicken stock. I used tri-color couscous, but it ended up looking like it was just 2 colors. Oh well. ;-)


Serve the kielbasa veggie mixture on top of the couscous. Voilá!

Enjoy! ~TMMF


Kielbasa Zucchini Sauté with Couscous

1 lb kielbasa
2 zucchini
½ lg red pepper
½ lg Vidalia onion
3-4 cloves garlic
2 Tbl oil
½ c chicken stock
1 tsp oregano
1 tsp red pepper flakes
1 c couscous
1 c chicken stock

Tuesday, April 12, 2016

Pizza Part 18: Loaded Steak Pizza


I *love* steak. We rarely have it due to how expensive it is, but I love it and if we get a gift card for a restaurant, usually I’ll order steak. I love mine rare, and loaded with sautéed peppers, onions, and mushrooms. Just thinking of it makes my mouth water!

So anyhoo, one night when I was going to make pizza for supper and throwing ideas around in my head for making up a new pizza, I thought of steak with all the extras on top, and thus my Loaded Steak Pizza was born. It took a few tries to get it to where I was satisfied it was perfect, and I hope you enjoy it.

So, let’s get cooking!


Set the frozen Philly steak on to cook in a large skillet or griddle, depending which brand you use. When done and cooled, you’ll want to make sure it’s pulled apart either by hand or chopping with a knife.


While that’s cooking, prepare your veggies: slice the onions and peppers into 1 inch lengths. Use whatever color you have on hand, but I love using green, red, yellow, and orange. Peel and mince the garlic.


Mix together the A1 Steak Sauce and mayo. Now, here’s a decision you need to make: do you want to add the minced garlic to the sauce, or would you rather struggle with sprinkling the sticky little varmints on top along with the vegetables like I did? It’s your choice. Make the right one. <whispers: put it in the sauce!>


Now, spread the pizza dough in the greased pan. Spread the sauce mixture on top, and then sprinkle the shredded mozzarella and Monterey Jack cheeses on.


Distribute the lovely assortment of bell peppers on the pizza…..


…..and the sweet Vidalia onions, along with the mushrooms.


Now for the tender shaved steak, and you’re ready to bake! You know my rules for making homemade pizza and calzones: 425° oven for exactly 18 minutes and not a minute more. ;-)

Serve up and savor the flavor.

Enjoy! ~TMMF


Loaded Steak Pizza

1 pizza dough
½ green bell pepper
½ red bell pepper
½ yellow bell pepper
½ Vidalia onion
1 huge clove garlic
1 c sliced mushrooms
7 oz Philly steak (frozen)
1 c shredded Monterey Jack cheese
1 c mozzarella cheese
½ c A1 Steak Sauce
2 Tbl mayonnaise

Friday, April 8, 2016

Asian Spaghetti


This recipe is from Taste of Home, and is so easy to make, it’s not even funny. Seriously. Did you see what I did there? ;-)    Anyhoo….this is a great recipe to involve the kids with, even younger ones: there is veggie slicing and carrot grating going on, and even a 4 year old can start learning to stir (the sauce). It works up so quickly and is so good, you’ll want to make this again and again.

This recipe calls for toasted sesame seeds, and I actually had them….but forgot to use them! They’re fairly expensive in local groceries like Walmart or Kroger, so if you can get them in bulk at someplace like Whole Foods, do so.

The changes I made: I used toasted sesame oil (I *love* that stuff!) along with the vegetable oil, increased the veggies, and, of course, upped the amount of garlic. ;-) I also doubled the recipe and we had leftovers the next day for lunch. I’m not ashamed to admit that I ate this for breakfast the next morning too! Hey, that just shows you how good it is!

So, let’s get cooking!


Cook the angel hair pasta (remember how quickly it cooks!), drain, and rinse with cold water to cool down, and set aside, with a little  oil mixed in if you’d like to keep it from sticking.


Slice the mushrooms, cut the scallions into 1” lengths, and grate the carrot.


In a small bowl, mix together the soy sauce, sugar, and cayenne pepper. You can up the cayenne if you want it extra spicy, or add red pepper flakes.


Now, in a large skillet, add the toasted sesame oil and vegetable oil to sauté the snow peas, scallions, and mushrooms, about 4 or 5 minutes, stirring frequently enough that you won’t be able to step away to do anything else.


Add the grated carrot and minced garlic, cooking and stirring for another minute.


Pour in the sauce and cook about a minute….


….and add the angel hair pasta, stirring well to coat with the sauce. Just cook it a little more to heat the pasta, really just a minute or so, stirring still.


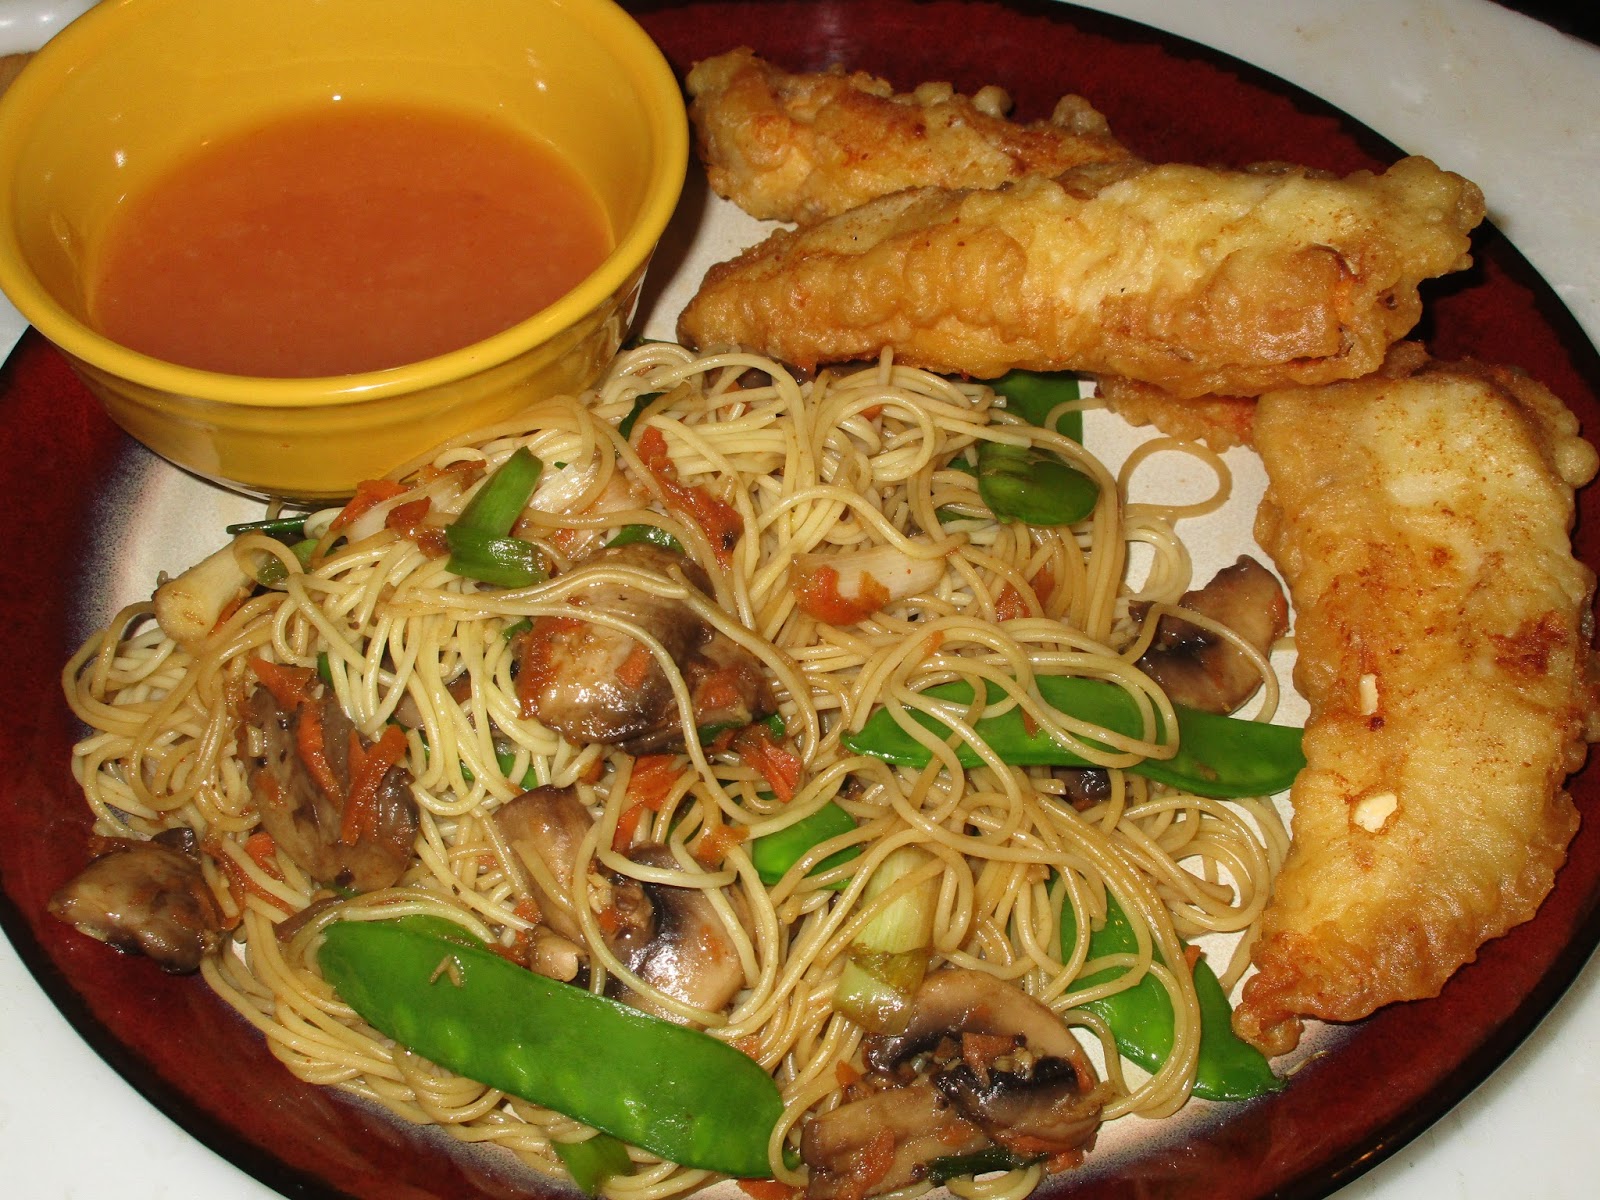
Now it’s done! We served this with Chicken Fingers with Sweet and Sour Sauce. (<---click for recipe)

Enjoy! ~TMMF

We loved the Chicken Fingers with Sweet & Sour Sauce! 


Asian Spaghetti

1 lb angel hair spaghetti
8 oz fresh mushrooms
2 c fresh or frozen snow peas
8-10 scallions
1 c grated carrot
4-5 big cloves of garlic
1/2 c soy sauce
2 tsp sugar
1/2-1 tsp cayenne pepper
2 Tbl toasted sesame seeds
   (optional)


Friday, February 19, 2016

Pizza Part 17: Spicy Shrimp and Asparagus Pizza


This is one of my original pizza recipes, and I have to say, it came out so stinking good that it was what everyone wanted. I make two different sheet pans of pizza when I make it, and while the other was very good, the Spicy Shrimp and Asparagus Pizza went like hot cakes off the griddle! I may have to just make two of them at a time from now on. By the way, I used only 1 tsp of sriracha in the sauce, but that was because Timmy and Megan don’t like things too hot; add an extra tsp of it if your family likes it spicier. Also, I would have thrown some red pepper flakes on top too, but didn’t for the same reason.

So, let’s get cooking!


You’ll want to steam the asparagus a little, so cut into pieces about an inch long. Place in a bowl with a small amount of water, cover with plastic wrap, and microwave for about 3 minutes.

While that’s going on, mince the red bell pepper finely.


Time to make the sauce! In a small sauce pan, add the cream cheese, milk, minced red bell pepper, garlic powder, black pepper, and sriracha sauce. Cook over low-ish heat to melt the cream cheese, stirring often. Stir in the parsley flakes. Allow to cool for a few minutes.

Spread the pizza dough on the greased pan, and then spread the sauce evenly on top. Sprinkle on the shredded mozzarella and pepper jack cheeses.


Distribute the asparagus and shrimp. Bake at 425° for 18 minutes. And now, dig in! Enjoy! ~TMMF


Spicy Shrimp and Asparagus Pizza 

1 pizza dough
½ lb asparagus
9 oz cooked shrimp, extra small
8 oz cream cheese
2 Tbl milk
¼ c minced red bell pepper
½ tsp garlic powder
1-2 tsp sriracha sauce
2 tsp parsley flakes
¼ tsp black pepper
1 c mozzarella cheese, shredded
1 c pepper jack cheese, shredded