Monday, February 18, 2013

Pizza Part 3: Philly Cheese Steak


Philly Cheese Steak pizza…easily one of my favorite pizzas, and I have many. I first had this at a pizza shop, a national chain. It was love at first bite. And I realized, I can make this! And so can you. So, let’s get cooking!


Slice the peppers and cut into halves or thirds, depending on the length of the slices. I like to use a variety of colors, and I like sweet peppers. For this I used a green bell pepper and an orange ancient sweet.

Cut the onion in half, place on the flat side, and slice. Cut those slices in half.


Sauté the peppers, onions, and sliced mushrooms in a little oil until slightly tender, stirring frequently.


Meanwhile, on a griddle sprayed with cooking spray, on medium heat, fry the Steak-umms, flipping once. When cooked thoroughly, chop up into bite size pieces.


Spread your pizza dough into a greased pan. I do have a large round deep dish pizza pan, but with a large family, it’s not enough. So I use two sheet pans when I make pizza.


Break up the American cheese and place evenly on the dough. I just rip pieces off each slice. Place the provolone cheese on top, evenly spaced apart.


Now spread the sautéed peppers, onions, and mushrooms on top, and then the chopped Steak-umm.


Bake for about 18 minutes in a 425° oven. Let cool a few minutes before cutting. Serve and listen to the moans of delight! ~TMMF


Philly Cheese Steak Pizza
     (for 1 pizza)

pizza dough
1 green bell pepper
1 sweet pepper of another color
1 medium Vidalia onion
2 sm. cans mushrooms or 2 c. fresh sliced
5-7 sheets of  frozen Steak-umms
8 slices American cheese
12 slices provolone cheese


Wednesday, February 13, 2013

Cheesy Scalloped Ham and Potatoes


What’s on the menu today? Cheesy Scalloped Ham and Potatoes! If it involves cheese, I’m in! This dish does require a little more time to prepare, but it’s very easy and well worth the effort.


Chop the onions and set them in a skillet with a little butter to sauté on medium heat until tender and browned.


While the onions are cooking, dice the ham. I like mine somewhat small because I can use less and still make sure every bite has plenty of ham in it.


After you've washed the potatoes, slice them into about 1/8” wide slices.

Grate the cheddar cheese and set aside.


Spray a 9 X 13” baking pan with cooking spray. Layer half the potato slices in the baking pan, and sprinkle half the ham and half the sautéed onions.


Layer the Swiss cheese and sprinkle half the cheddar cheese on top. Sprinkle salt and pepper if you’d like.


Begin again, layering the potatoes, ham, sautéed onions, and then lastly, the rest of the cheddar cheese. The Swiss cheese is only placed in the middle of this casserole.

Open the evaporated milk and pour evenly over the entire casserole.

Bake at 350° for about 45 minutes. Let set 5-10 minutes and serve.


Cheesy Scalloped Ham and Potatoes
     (serves 6-8)

6 large potatoes
1 medium Vidalia onion
1-1 ½ c. ham
6-8 slices Swiss cheese
1 ½ c. extra sharp cheddar cheese
2 cans evaporated milk


Monday, February 11, 2013

Crock Pot Chili


It’s chilly, so it’s time to make chili! This is such a simple and quick recipe, and I’ve been making it like this for years. This is one of those crock pot meals that I loved to make on Saturday night to have ready for lunch on Sunday after church. Make some dinner rolls to go with it, or for a quick accompaniment, pick up some French bread at the grocery.

Let’s get cooking!


You’ll need to open the cans of diced tomatoes, tomato paste, and kidney beans. I usually ask someone who doesn’t have as much arthritis to do it for me. ;) Drain the kidney beans but do not rinse.


Next, dice up the onions, peppers, and celery. When I made this the other night, I happened to only have some yellow, orange, and red sweet peppers, so that’s what I used. I do like to have green bell pepper along with other colors, just because I like how nice it makes the chili look, if I have some.


Peel and mince the garlic. I actually had taken the photo of the lovely veggies before I minced the garlic, so it missed the boat in this picture. Oh well, I use garlic a lot, so there’ll be another “photo op” for it in the future. ;)


Put the tomatoes, tomato paste, drained kidney beans, and all vegetables in the crock pot.


Add the hamburg. This is optional, but I usually add at least a little bit for the ones who like it. This is one of the bags of browned hamburg that I had in the freezer. I just put it in the microwave for three minutes and it was ready to use.


Add the brown sugar, medium hot chili powder, and black pepper. I don’t add salt to this; there’s already a lot of sodium in the tomatoes.


Cook on low in the crock pot overnight. I usually start it out on high for 2 hours, then turn down to low until lunch the next day. Stir many times throughout.

Serve with grated extra sharp cheddar cheese and some sour cream if you’d like. I love the way the sour cream adds a cool creamy compliment to the spicy hot chili! ~TMMF

Crock Pot Chili
(serves 8 with leftovers!)

2 large cans diced tomatoes
1 small can tomato paste
2 cans light red kidney beans
2 cans dark red kidney beans
1 large Vidalia onion
2 peppers, any color
2 stalks celery
5-6 cloves garlic
2-3 Tbl. brown sugar
2-3 Tbl. medium hot chili powder
2 tsp. black pepper


Saturday, February 9, 2013

Pizza Part Deux: Chicken Bacon Ranch


So, pizza again. Last time we discussed pizza, we talked about making  pizza dough and tomato based sauces for it.

Today we’ll work on a pizza with a different kind of sauce, Chicken Bacon Ranch pizza.


First, set the chicken breast to sauté in a skillet with a little oil. You can leave it whole and cut after cooking, or slice it beforehand.


In another pan, cook the bacon. I prefer mine to be somewhat soft cooked, but most people like it crispy crumbly.

When both are done, cut the chicken into small pieces and chop up the bacon.


While the meats are cooking, prepare the sauce. For a ranch sauce, I like to mix the ranch dressing with mayonnaise. The mayonnaise really does enhance the flavor of the dressing, making it creamier and more flavorful.


Press your dough into the greased pan, and spread the ranch/mayo sauce evenly on it. Sprinkle the mozzarella cheese over it.


Next put the cut up chicken and bacon on it. And you’re ready to pop it into your pre-heated 425° oven, for 18 minutes, to make this…


…come out like this! Enjoy! ~TMMF


Chicken Bacon Ranch Pizza
     (for 1 pizza)

pizza dough
1 large or 2 small chicken breasts
6-8 oz. bacon
2 c. shredded mozzarella cheese
1/2 c. ranch dressing
1/2 c. mayonnaise


Friday, February 8, 2013

Chicken Fajitas


Chicken fajitas…ah, chicken fajitas. One of our most favorite meals. Though they do require a little more work than some meals, they are delicious and so worth the effort. So, let’s get cooking!


Start the chicken sautéing in a little oil. You can cook the breasts whole, and then slice, or you can slice them first and then sauté. It’s much easier to slice them first if they’re slightly frozen.


While the chicken is cooking, slice up the peppers and onions. I usually like to cut the peppers into thirds after slicing them into strips.

For the onions, cut in half, lay the flat side down, and slice. Then cut the slices in half.


Sauté the peppers and onions in a skillet with a little oil. I like to put my skillet on high before I add the veggies and then sauté just until slightly tender, stirring almost constantly.


Grate the cheddar cheese and set aside.

Get the rest of the ingredients ready: tortilla wraps, salsa, and, if you’d like, sour cream.


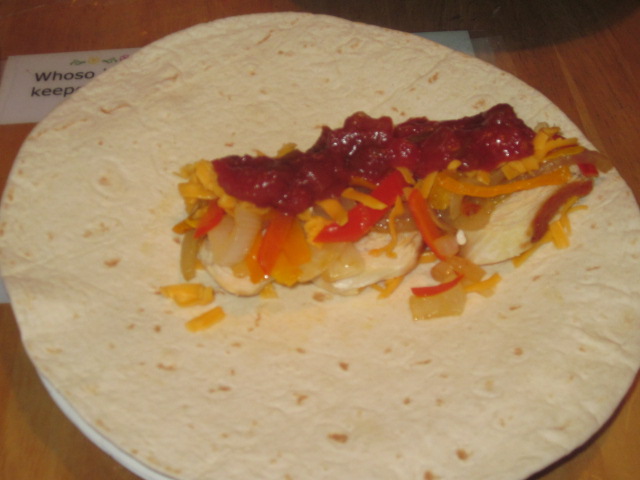
Now for the assembly. On a wrap, place several chicken slices in the middle, from the top to about 2/3 of the way down. Put about ¼ c. of the peppers and onions on top. Next, sprinkle about 2 Tbl. of the extra sharp cheddar cheese. Spoon out about ¼ c. salsa onto the cheese. If you like, add 2 Tbl. sour cream. I’m not so fond of it on mine, but the kids love sour cream on their fajitas.


To finish, fold up the bottom of the tortilla wrap, then fold each of the sides towards the middle. Just slightly easier than wrapping egg rolls.

This recipe is very easy to make lower in fat and calories, according to your needs. Use cooking spray instead of oil for sautéing the chicken and veggies, used reduced fat cheddar cheese, and use light or fat-free sour cream. That’s just one of the many joys of cooking, that you can adapt recipes to the tastes and needs of you and your family. Enjoy! ~TMMF

Chicken Fajitas
     (serves 6-8)

3 chicken breasts, boneless and skinless
2 sweet peppers, any color
1 large or 2 medium Vidalia onions
4-6 oz. extra sharp cheddar cheese
salsa, whatever heat you prefer
sour cream (optional)


Wednesday, February 6, 2013

Delicious Quick Chocolate Sauce


Ever get a craving for ice cream and some good, I mean good, hot fudge sauce? This is a recipe that my mother made when my siblings and I were growing up, and it is de-licious!

It also works up quickly, and is better tasting than store bought, so it’s great for an easy special dessert when you have guests.


In a small saucepan, cook the milk and unsweetened baking chocolate squares on low to medium heat until chocolate melts, stirring constantly. As it is almost completely melted, it takes on a thick consistency.

Stir in the sugar, and continue cooking and stirring with a wooden spoon or a whisk.


Add the butter and salt, blending well.

Continue to cook and stir about  5 minutes till slightly thick.


Remove from heat and stir in the vanilla.

The sauce will thicken on standing; let sit about five to ten minutes or so.


Scoop ice cream into bowls, and ladle your scrumptious hot fudge sauce on top. Watch the smiles appear!

Delicious Quick Chocolate Sauce

3 sq. unsweetened baking chocolate
½ c. milk
¾ c. sugar
1 Tbl. Butter
Dash of salt
¾ tsp. vanilla


Sunday, February 3, 2013

Angel Hair Pasta with Crab Meat


Need a meal quick? Here’s a nifty little dish that my kids love, and if you want a nice dish for unexpected company that works up quickly, this is it. Let’s get cooking!


There are just four ingredients in this recipe. Count them…FOUR. Just one of the things I love about it.

And it literally takes just 30 minutes or less from the beginning of preparation to dinner on the table.

Put your water on to boil for the angel hair pasta.


Slightly cut up the crab meat, and peel and mince the garlic cloves. You can use as few as 3-4 cloves of garlic, or six or seven if you love garlic the way my family does. Our breath may knock over even a man in a Haz-mat suit, but hey, at least we know we’re safe from vampires. ;)

(Just for the record, no I don’t believe in vampires, but I do enjoy joking about them occasionally.)


Another great thing about this dish is that you can add shrimp to it, add scallops, add both…or simply scrap the whole crab meat idea and just go with the other seafood. But at least try it with the crab; it lends a subtle sweetness to the dish that is just scrumptious.


Now, in a sauté pan, place the crab meat with at least ¼ c. butter and heat through on medium heat, about ten minutes.

Add the minced garlic and cook another five minutes, stirring frequently.


By now the water should be boiling and ready for your pasta. Angel hair pasta literally takes only about 4-5 minutes to cook, so stay with it.

When done, drain well and put it back in the pan. Add a little butter and/or oil (olive oil, vegetable oil, whatever you prefer).


Now you’re ready to serve. Place a serving of angel hair pasta on the plate, spoon out a portion of the buttery crab meat and garlic, and serve with a smile. So quick, so easy, and a family favorite here. ~TMMF


Angel Hair Pasta with Crab
     (serves 6)

1-1 ½ lb. imitation crab meat
5 cloves garlic
¼-½ c. butter
1 lb. angel hair pasta